Jackhammer OSHA Conversion Kit

Use to Comply with OSHA's Crystalline Silica Rule

Part No: 7084JHT75-KIT

Parker's jackhammer conversion kit includes all the parts you need to upgrade your jackhammer so that it complies with OSHA's Respirable Crystalline Silica (RSC) Standard (29 CFR 1926.1153). Adding the capability to spray water on work surfaces during operation will help to suppress any airborne particles that are created when the jackhammer tip breaks rock, concrete, and other materials containing crystalline silica.

Upgrading existing jackhammers with water spraying capabilities eliminates the need for an additional worker to spray the surface with a separate hose. Once retrofitted with the conversion kit, connect the jackhammer to Parker Twinhammer Hose (7087JHT75-600). The Twinhammer hose supplies both compressed air and water to the jackhammer in a simple, streamlined way. No need for handling two hoses - one for compressed air and another for water - or to deal with zip ties, duct tape, or other methods of holding two hoses together.

Download: Jackhammer Conversion Kit Installation Guide PDF

OSHA's Crystalline Silica Rule in a Nutshell

Respirable Crystalline Silica refers to very small airborne silica particles (up to 100 times smaller than ordinary grains of sand) which are created when jackhammering, cutting, sawing, grinding, drilling, and crushing stone, rock, concrete, brick, block, and mortar. Workers who inhale RCS are at increased risk of developing serious silica-related diseases, including silicosis, lung cancer, chronic obstructive pulmonary disease (COPD), and kidney disease.

OSHA requires employers to limit exposure to RCS and to take other steps to protect workers. Employers can either use equipment with integrated water delivery, or they can measure workers’ exposure to silica and independently decide which dust controls work best to limit exposure in their workplace to the permissible exposure limit (PEL).

In 2017, OSHA increased the fines for non-compliance and tied future increases in penalties to consumer price index. In 2018, the maximum penalty for non-compliance is $12,934 for the first offense.

Protect your workers and don't risk hefty fines - upgrade all your jackhammers today.

Jackhammer Hose Spray Kit - Specifications
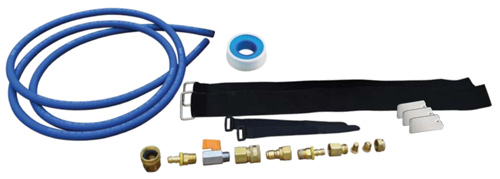

 parker-jackhammer-hose-conversion-kit.png  Kit Contents
General Description Qty
Fitting, push-on male 2
Fitting, quick connect female 1
Fitting, quick connect nipple 1
Hose, blue jumper, push-on, 10 ft 1
Nozzle body 1
Nozzle cap 1
Nozzle shim (optional use) 3
Nozzle strainer 1
Nozzle tip 1
Straps, large 2
Straps, small 2
Tape, thread sealant 1
Valve 1
Fitting, bushing/adapter for water supply (optional use) 1
Fitting, garden hose for water supply (optional use) 1


IMPORTANT!
Hose and hose fittings series must be correctly matched. Using any fittings other than those specifically designated by the hose manufacturer for use with each specific hose can lead to hose assembly failure. Hose assembly failures have lead to damage, injury and death.

WARNING: This product can expose you to chemicals including lead and/or DEHP and/or carbon black, which are known to the State of California to cause cancer or birth defects or other reproductive harm.  For more information go to www.P65Warnings.ca.gov

Request a Quote for Parker 7084 Twinhammer Hose and Kits

Twinhammer Jackhammer Hose Spray Kit - Installation

Click here to download a complete guide (including pictures of each step) with instructions to install your Jackhammer Hose Spray Kit.

Step 1

  • Identify which end of the Twinhammer hose assembly will attach to the tool.
  • Apply thread sealant to the fitting of the blue water supply hose.
  • Thread the ball valve directly onto the blue water hose.
  • Tighten 1/4 turn.

Step 2

  • Apply thread sealant to the ball valve.
  • Tighten the female coupler of the quick connect fitting onto the ball valve.

Step 3

  • Lightly thread the male nipple of the quick connect fitting into one of the Push-On hose fittings.
  • Do not tighten more than hand-tight - this item will be taken apart before final assembly.

Step 4

  • Insert the male nipple of the quick connect fitting into the female quick connect fitting. (This will be used to help determine the length of Push-On jumper hose needed in Steps 11 and 12.)

Step 5

  • Insert the other Push-On hose fitting into one end of the Parker Push-On hose. (This hose will be used as a jumper hose from the water supply line down the tool to position the nozzle at the retainer area.)
  • Be sure that the Push-On fitting is inserted completely and the hose rests against the yellow collar of the fitting.

Step 6

  • Assemble the spray nozzle, which consists of four components: Cap, spray tip, strainer and body.
  • Place the spray tip into the cap.
  • Place the strainer into the cap, on top of the spray tip. Orient the wide end against the tip and the tapered end out.
  • Apply thread sealant to the body.
  • Thread the body into the cap, keeping the strainer centered.
  • Tighten.

Step 7

  • Apply thread sealant to the installed Push-On hose fitting.
  • Thread and tighten the nozzle body assembly onto the fitting.

Step 8

  • Align the nozzle tip with the end of the front head of the tool.
  • Rest the jumper hose assembly against the tool retainer to properly position the nozzle and strap.

Step 9

  • Apply one of the large cinch straps to secure the nozzle and jumper hose to the end of the tool.
  • Position the metal buckle over the nozzle assembly to better secure the nozzle and minimize movement.

Step 10

  • Route the jumper hose up the tool and use the second large cinch strap to secure it near the top of the tool.
  • Allow a generous bend radius for the hose to provide better water flow and prevent kinking.

Step 11

  • Apply the red air hose assembly to the tool.
  • Align the jumper hose with the Push-On fitting at the end of the blue water supply hose.
  • The jumper hose should maintain a gentle bend radius but assume the most direct path to the water supply hose fitting. (A sharp bend of the hose at the fitting will cause stress and could lead to premature hose failure.)

Step 12

  • Align each component with its final position.
  • Mark the blue jumper hose at the top of the yellow collar of the fitting. This is the cut line.
  • Cut the hose squarely at the cut line.

Step 13

  •  Remove the Push-On fitting from the quick connect nipple (see Step 3).

Step 14

  • Insert the Push-On fitting into the open end of the jumper hose. Be sure to insert fully to the collar (see Step 5).
  • Use the body of the tool as a brace when applying pressure to insert the fitting.

Step 15

  • Apply thread sealant to the Push-On fitting that was inserted into the jumper hose.
  • Thread and tighten the male nipple quick connect fitting onto the Push-On fitting.

Step 16

  • Insert the male nipple into the female quick connect fitting.
  • Align the connected water hose/jumper hose assembly with the air hose already installed on the air intake connector of the tool.

Step 17

  • Use one small strap at the interface of the male nipple/female quick connect fitting to secure the air intake connector and blue jumper hose.
  • Use the other strap to secure the two hoses of the Twinhammer assembly just below the factory-installed fittings. This provides a slim profile, rigidity for operating the ball valve and support to keep the twinned hoses from separating.

Step 18

  • Connect to appropriate air and water supplies.
  • Use ball valve to adjust water flow.
  • Use provided shims (if needed) to direct spray angle of nozzle to point of impact.