AC hose repair using Parker refrigerant tube mender | Ferrul-Fix
|
|
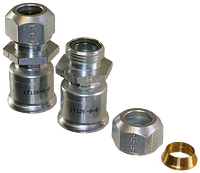
The Parker tube mender provides a great option for repairing an automotive AC hose assembly instead of replacing it. This comes in handy if the replacement AC hose and fittings are not readily available. The tube mender can be used for other similar applications, where a hose with 26-series fittings can be used. Ask for P/N 1T126 (metric tubing only) and provide the hose and tube size. |
Requirements for Using the Tube Mender
- The fitting must have a long enough straight tube section for the Ferrul-Fix to attach to (about 1” minimum).
- The tube mender must be used with a hose compatible with 26-series fittings.
Installation Instructions:
- Cut the tube off squarely next to the hose fitting. At least 7/8” straight length is required and the outside surface of the tube should be smooth and free from deep lengthwise scratches.
- To prevent cutting the inside of the O-Ring, smoothly chamfer the outside of the cut end 15˚ to 30˚. Deburr the inside.
- Remove the nut, compression sleeve, and O-Ring from the fitting and lubricate the O-Ring with a lubricant that is compatible with the refrigerant used in the system.
- Place the lubricated O-Ring in the counterbore of the fitting.
- Slip the compression sleeve, small end, into the nut and assemble the nut on the fitting fingertight. Make sure the compression sleeve is not cocked in the nut. Back the nut off 1/6 to 1/3 turn (one to two hex flats).
- Insert the chamfered tube end through the nut into the fitting. If high resistance is felt when the end of the tube contacts the O-Ring, remove the tube. The end of the tube may require a large chamfer and/or the O-Ring may require more lubrication on the inside. Repeat the previous steps.
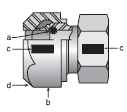
 (a) - (d) correspond to the markers in the diagram:
 - (a) Make sure the tube is bottomed in the fitting.
- (b) Tighten the nut finger tight.
- (c) Mark the fitting and nut hex indicating the starting point (see illustration).
- (d) Wrench tighten the nut 1 to 1 1/6 turns (6 to 7 hex flats).
- Later, if it is ever necessary to loosen the connection, re-assemble the nut 1/6 turn (one hex flat) after finger tight.

